Circuit Cellar together with Texas Instruments have launched a design contest around the Stellaris LM3S9B96 microcontroller. This 100 pin controller is based on a 32-bit ARM Cortex–M3 core with 256 KB flash memory, 96 KB RAM and it sports many interesting features like CAN, USB 2.0 OTG/Host/Device, 10/100 Ethernet MAC and PHY, I2C, I2S, SSI, UART, PWM, ADC and some other peripherals. Although this is more or less what you would expect from a modern 32-bit microcontroller, it is not all: the device also has a built-in library with almost 400 functions to access its peripherals. This BIOS (Basic Input Output System) provides a nice hardware abstraction layer for almost all of the registers and makes life of the programmer much easier.
To top thing off, the device also has a built in real time operating system (RTOS)! According to the datasheet the controller has a copy of SafeRTOS inside, a secure version of FreeRTOS edited by Wittenstein. Unfortunately, the datasheet isn’t very verbose about it, but it is there.
Now what do you call a processor with peripherals, a BIOS and an operating system? A computer! Indeed, this microcontroller is pretty much like a computer on a chip (CoC) and the only thing missing is a graphical interface, but that is probably just a matter of time and/or pin count.
Are we entering a new era of microcontrollers? Will this be the new standard architecture for the next generation of microcontrollers? What about code portability? Will the user get access to the source code of the built-in BIOS and RTOS? Will ARM, TI & Wittenstein be the next Intel, AMD and Microsoft?
At the end of 2008 I assisted at an ARM conference in Paris. The buzz word then was "code portability". If only everybody would be using ARM-based processors, then code would be easily portable from one device to another. Luminary, the developper and former owner of the Stellaris processors, was present too. But is the BIOS & RTOS they now put in their devices good for code portability? Will other ARM-based microcontroller manufacturers too integrate a compatible BIOS & RTOS in their devices or provide compatible libraries? Or are we going to have to deal with tens of different BIOS-es and RTOS-es in the future, supported by code bloating tests to figure out what the heck the platform actually used is capable off?
Devices will get bigger and will integrate more and more. Within a couple of years they will be as powerfull as a modern PC is now, with built-in BIOS and OS. This all smells so much of Microsoft and the OS wars from the past years.
NOOOOOOOoooo!!!!!
Please, not again!
Thursday, January 28, 2010


Saturday, January 23, 2010
Worldwide Serial Web
You may have heard of WIZnet, the Korean company that makes several embedded Ethernet controllers with an integrated hardwired TCP/IP stack. Their flagship, the W7100, also has an 8051 compatible processor inside. They not only make & sell chips, they also sell modules, evaluation boards and even complete products that use their chips. These modules allow you to add Ether- & Internet connectivity to your project without much headache. WIZnet now also offers a great free (you have to register to get a serial number) software tool that lets you connect to serial ports over a network.
This tool called WIZ VSP (for Virtual Serial Port) is pretty cool indeed. It lets you install up to 99 real or virtual COM ports (the documentation talks about 255, but the software doesn’t let you go higher then COM99), as a server, a client or a shared port. A server will wait for clients to connect to it. A client connects to a server. The shared port uses UDP instead of TCP and will talk to one remote host and listen on a port.
A server supports multiple clients. This means that you can distribute data received on the server COM port to multiple clients that can all talk to the server. Such a configuration can be useful as a serial port concentrator, for instance.
The shared port over UDP can do the same thing as a server, except that it is connectionless. It also only talks to one other host (but listens to anyone talking to him), unless you specify a broadcast address.
I’ve tried the tool and it works remarkably well. The documentation is a bit cryptic at some points and the fact that I used one PC under Windows Vista complicated matters a bit, but in the end I managed to transmit serial data between two PCs in al three configurations. Here is how to do it:
First download the software and the manual (separate download!) and install the program. Then request a serial number by sending an email to the indicated address. When you get the serial (you may have to answer some questions) enter it when the program asks for it (without serial it will NOT work). Now you can start creating serial servers and clients.
On the “Create Connection” tab select the type of connection and the number of the serial port. Note that if the serial port exists in hardware, i.e. is real (can be a USB type or Bluetooth) you can clear the checkbox “Create as virtual serial port”. This way the software will use the real port and you can specify the serial port parameters (baudrate, data bits, etc.) on the “Connection prefs” tab. Depending on the connection type you will have to specify a host IP and a port number. You can configure some more on the other tabs and once you’re done, click the “Create connection” button. If the port did not yet exist you will now hear the typical Windows add-new-hardware sound and the port shows up in the tree display. To edit a created port you have to use the “Edit connection” tab.
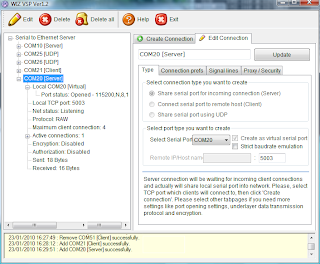
This shows the server setup on a Vista PC.
On another PC you do the same thing, but complementary. If you created a server on the first, create a client on the second. If you created a UDP connection on the first PC, you should create also a UDP connection on the second. Make sure to specify the right host IP numbers and to use the same port numbers on both PCs. Also better switch of any firewalls. I had to do that on the Vista PC before my XP PC would receive any data even though Vista did receive without any problem.
BTW, as host IP it is also possible to specify “localhost”. This way you can make serial ports on the same PC talk to each other.
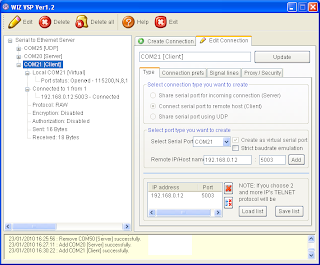
Here is the XP client that talks to the Vista PC.
To familiarize yourself with the tool I suggest to first only use virtual ports and a terminal program. This way you can type and see what happens.
Once you know how to properly setup WIZ VSP, your application can use a serial port on another PC, anywhere in the world! Or a serial device (f.i. a GPS) can transmit data to multiple hosts. I am sure you can come up with some other useful configuration. This is a very powerful tool and anyone using serial ports should get a copy of it. Now!
Oh, one more thing. Once the connections are established you can close the program without killing them.
This tool called WIZ VSP (for Virtual Serial Port) is pretty cool indeed. It lets you install up to 99 real or virtual COM ports (the documentation talks about 255, but the software doesn’t let you go higher then COM99), as a server, a client or a shared port. A server will wait for clients to connect to it. A client connects to a server. The shared port uses UDP instead of TCP and will talk to one remote host and listen on a port.
A server supports multiple clients. This means that you can distribute data received on the server COM port to multiple clients that can all talk to the server. Such a configuration can be useful as a serial port concentrator, for instance.
The shared port over UDP can do the same thing as a server, except that it is connectionless. It also only talks to one other host (but listens to anyone talking to him), unless you specify a broadcast address.
I’ve tried the tool and it works remarkably well. The documentation is a bit cryptic at some points and the fact that I used one PC under Windows Vista complicated matters a bit, but in the end I managed to transmit serial data between two PCs in al three configurations. Here is how to do it:
First download the software and the manual (separate download!) and install the program. Then request a serial number by sending an email to the indicated address. When you get the serial (you may have to answer some questions) enter it when the program asks for it (without serial it will NOT work). Now you can start creating serial servers and clients.
On the “Create Connection” tab select the type of connection and the number of the serial port. Note that if the serial port exists in hardware, i.e. is real (can be a USB type or Bluetooth) you can clear the checkbox “Create as virtual serial port”. This way the software will use the real port and you can specify the serial port parameters (baudrate, data bits, etc.) on the “Connection prefs” tab. Depending on the connection type you will have to specify a host IP and a port number. You can configure some more on the other tabs and once you’re done, click the “Create connection” button. If the port did not yet exist you will now hear the typical Windows add-new-hardware sound and the port shows up in the tree display. To edit a created port you have to use the “Edit connection” tab.

This shows the server setup on a Vista PC.
On another PC you do the same thing, but complementary. If you created a server on the first, create a client on the second. If you created a UDP connection on the first PC, you should create also a UDP connection on the second. Make sure to specify the right host IP numbers and to use the same port numbers on both PCs. Also better switch of any firewalls. I had to do that on the Vista PC before my XP PC would receive any data even though Vista did receive without any problem.
BTW, as host IP it is also possible to specify “localhost”. This way you can make serial ports on the same PC talk to each other.

Here is the XP client that talks to the Vista PC.
To familiarize yourself with the tool I suggest to first only use virtual ports and a terminal program. This way you can type and see what happens.
Once you know how to properly setup WIZ VSP, your application can use a serial port on another PC, anywhere in the world! Or a serial device (f.i. a GPS) can transmit data to multiple hosts. I am sure you can come up with some other useful configuration. This is a very powerful tool and anyone using serial ports should get a copy of it. Now!
Oh, one more thing. Once the connections are established you can close the program without killing them.
Friday, January 15, 2010
Energy harvesting power supply
This week I came across an interesting new product from Linear Technology: the LTC3588 energy harvesting power supply intended for powering remote microcontroller systems. According to the product description this chip is a complete energy harvesting solution optimized for low energy sources, including piezoelectric transducers.
A buzzer?
The LTC3588 datasheet does mention some manufacturers of piezoelectric transducers that can be used with the chip. I looked one up: the T220-A4-503X from Piezo Systems. As I allready suspected, it is not really a buzzer. It is also more expensive than a buzzer: $125. You can buy a lot of batteries for that money, but it is probably cheaper than to send out a maintenance engineer to replace a dead battery. This particular transducer can deliver 5.4 mW RMS when it vibrates ±1.57 mm at 80 Hz. It comes as a 0.5 mm thick card of 31.8 x 63.5 mm (1.25" x 2.5") that has to be soldered with special solder (the transducer has nickel electrodes).
OK, so this kind of piezoelectric transducers is probably not for me, but the LTC3588 datasheet shows other ways of using the chip: with a solar panel or a thermoelectric transducer or as an electric field harvester.
I like the last one. It uses two 30 x 60 cm (12" x 24") sheets of copper at about 15 cm (6") from a 60 x 120 cm (2' x 4') fluorescent light fixture. At such a short distance you might as well wire the chip directly to the light fixture supply, right? Luckily the datasheet also shows you how to do that.
Yet the LTC3588 seems like a pretty interesting chip and I ordered some samples. I will let you know if I get them and if I did, what I managed to do with them.
LTC3588 datasheet
Piezo Systems
A nice introduction to piezoelectric transducers
A buzzer?
The LTC3588 datasheet does mention some manufacturers of piezoelectric transducers that can be used with the chip. I looked one up: the T220-A4-503X from Piezo Systems. As I allready suspected, it is not really a buzzer. It is also more expensive than a buzzer: $125. You can buy a lot of batteries for that money, but it is probably cheaper than to send out a maintenance engineer to replace a dead battery. This particular transducer can deliver 5.4 mW RMS when it vibrates ±1.57 mm at 80 Hz. It comes as a 0.5 mm thick card of 31.8 x 63.5 mm (1.25" x 2.5") that has to be soldered with special solder (the transducer has nickel electrodes).
OK, so this kind of piezoelectric transducers is probably not for me, but the LTC3588 datasheet shows other ways of using the chip: with a solar panel or a thermoelectric transducer or as an electric field harvester.
I like the last one. It uses two 30 x 60 cm (12" x 24") sheets of copper at about 15 cm (6") from a 60 x 120 cm (2' x 4') fluorescent light fixture. At such a short distance you might as well wire the chip directly to the light fixture supply, right? Luckily the datasheet also shows you how to do that.
Yet the LTC3588 seems like a pretty interesting chip and I ordered some samples. I will let you know if I get them and if I did, what I managed to do with them.
LTC3588 datasheet
Piezo Systems
A nice introduction to piezoelectric transducers
Thursday, January 7, 2010
Accelerometers
Freescale announced this week their latest accelerometer MMA7660FC. This is a 3-axis digital output (I2C), very low power, low profile capacitive micro machined accelerometer featuring a low pass filter, compensation for 0g offset and gain errors, and conversion to 6-bit digital values at a user configurable output data rate. It offers low-power operation of 47 µA at 1 sample per second. The device can be used for sensor data changes, product orientation, and gesture detection through an interrupt pin.
Cool!
The product description ends with: "The device is housed in an extremely small 3 mm x 3 mm x 0.9 mm DFN package."
Bummer...
Elektor will present very soon its mobile 32-bit platform Sceptre which includes, amongst others, a 3D accelerometer from Freescale. For the Sceptre I have spent a lot of time looking for hand-solderable accelerometers but without success. Do easy to solder accelerometers actually exist? I guess not, but maybe someone will know of one and tell me about it. A more useful question is probably:
Do you have a technique for reliably soldering QFN or DFN packages by hand?
This question interests me very much, and, I am sure, many other people as well.
Here is a picture of the Sceptre that I sneaked out of the lab.
Hot, hot, hot!!!

This is one of the first three prototypes and it still works (one died during temperature testing). A second version that fixes some bugs and adds some improvements is on its way.
The accelerometer is the little black square in the left lower corner of the board (its a QFN unfortunately). On the top right is a Bluetooth module and if you look well enough you can see on the left an SD card sticking out from the bottom of the card. It runs from a mobile phone batterie and a charger for it is included on the board.
Stay tuned!
Cool!
The product description ends with: "The device is housed in an extremely small 3 mm x 3 mm x 0.9 mm DFN package."
Bummer...
Elektor will present very soon its mobile 32-bit platform Sceptre which includes, amongst others, a 3D accelerometer from Freescale. For the Sceptre I have spent a lot of time looking for hand-solderable accelerometers but without success. Do easy to solder accelerometers actually exist? I guess not, but maybe someone will know of one and tell me about it. A more useful question is probably:
Do you have a technique for reliably soldering QFN or DFN packages by hand?
This question interests me very much, and, I am sure, many other people as well.
Here is a picture of the Sceptre that I sneaked out of the lab.
Hot, hot, hot!!!

This is one of the first three prototypes and it still works (one died during temperature testing). A second version that fixes some bugs and adds some improvements is on its way.
The accelerometer is the little black square in the left lower corner of the board (its a QFN unfortunately). On the top right is a Bluetooth module and if you look well enough you can see on the left an SD card sticking out from the bottom of the card. It runs from a mobile phone batterie and a charger for it is included on the board.
Stay tuned!
Wednesday, December 30, 2009
Do you know MIPS?
You probably have heard about ARM processors. ARM seems to be everywhere and we are flooded by press announcements about new ARM-based products. This might make you think that ARM is currently the most successful processor around, especially if we think about 32 bit processors. But did you know that there exists another 32 bit processor for embedded applications? Well, yes, of course, there are other 32 bit microcontrollers that are not ARM, but there is one particular brand that you probably have as a brain for at least one of your electronic gadgets: the MIPS processor.
Like ARM, MIPS Technologies does not make silicon, but only so-called soft cores, a piece of software that describes a processor core. To use a soft core you have to licence it and put it in a chip yourself. There are many MIPS cores, not only 32 bit but also 64 bit, and there are many companies that use one of those in their products. To name a few (in random order): Sony, Realtek, Broadcom, Pioneer, Motorola, Cisco, Microchip, Hewlett-Packard, Philips, Toshiba, Canon, Samsung, JVC, Pentax, Casio, Minolta, NEC, Fujifilm, Ikanos, etc., etc. That is quite an impressive list for a processor that we hardly ever hear about, isn't it?
As you can see from the list of MIPS users, these are all big well-known companies that make many types of consumer products, which explains why you probably own at least one MIPS processor. Digital camera's, network routers, Wi-Fi access points, DSL modems, printers, netbooks, digital photo frames, DVD players, GPS receivers, game consoles and even cars, many of them contain a MIPS core. Unlike ARM, MIPS Technologies does not make a lot of noise, yet their products are everywhere.
But there is one major product in which you will not likely find a MIPS: the mobile phone. This market is almost completely dominated by ARM, but MIPS is hoping to get in thanks to Google's Android, the open source smart phone operating system. Android, developed for ARM processors, is a platform that current MIPS users might want to use too, so MIPS Technologies started porting it to their products. And then, with a bit of luck, MIPS users will start building smart phones with MIPS cores.
For the electronics hobbyist the easiest way to get started with MIPS is probably to buy a PIC32 processor from Microchip. The PIC32 is based on the MIPS32 M4K family and according to Microchip they perform better than an ARM7 clocked at 100 MHz.
If you look hard enough you can also find single board computers with MIPS processors and run for instance Linux-MIPS on it. Or hack a router and play with OpenWRT.
Share your MIPS experiences!
Like ARM, MIPS Technologies does not make silicon, but only so-called soft cores, a piece of software that describes a processor core. To use a soft core you have to licence it and put it in a chip yourself. There are many MIPS cores, not only 32 bit but also 64 bit, and there are many companies that use one of those in their products. To name a few (in random order): Sony, Realtek, Broadcom, Pioneer, Motorola, Cisco, Microchip, Hewlett-Packard, Philips, Toshiba, Canon, Samsung, JVC, Pentax, Casio, Minolta, NEC, Fujifilm, Ikanos, etc., etc. That is quite an impressive list for a processor that we hardly ever hear about, isn't it?
As you can see from the list of MIPS users, these are all big well-known companies that make many types of consumer products, which explains why you probably own at least one MIPS processor. Digital camera's, network routers, Wi-Fi access points, DSL modems, printers, netbooks, digital photo frames, DVD players, GPS receivers, game consoles and even cars, many of them contain a MIPS core. Unlike ARM, MIPS Technologies does not make a lot of noise, yet their products are everywhere.
But there is one major product in which you will not likely find a MIPS: the mobile phone. This market is almost completely dominated by ARM, but MIPS is hoping to get in thanks to Google's Android, the open source smart phone operating system. Android, developed for ARM processors, is a platform that current MIPS users might want to use too, so MIPS Technologies started porting it to their products. And then, with a bit of luck, MIPS users will start building smart phones with MIPS cores.
For the electronics hobbyist the easiest way to get started with MIPS is probably to buy a PIC32 processor from Microchip. The PIC32 is based on the MIPS32 M4K family and according to Microchip they perform better than an ARM7 clocked at 100 MHz.
If you look hard enough you can also find single board computers with MIPS processors and run for instance Linux-MIPS on it. Or hack a router and play with OpenWRT.
Share your MIPS experiences!
Friday, December 18, 2009
Take the time to learn your system
I’ve always been fascinated by microcontroller systems and the process of making them come to life.
It all starts by designing the system, a controller with some peripheral hardware. Once I finally have a prototype of my design the first thing I do is to see if I can talk to the processor. This is always an exciting moment. Will it respond? Will it program?
I prepare a small hello-world type of program and try to load it into the controller (or in its external memory, depending on what I am working on). Suppose all went well and the controller accepted the program (what a deception if it didn’t). Usually the hello-world program is flawed and doesn’t work as intended. Maybe I was too brave and tried to put too much in it, maybe I didn’t understand some functionality? I modify the program and try again, but still nothing. So I hook up the oscilloscope and start probing around. Aha! found a signal, but on the wrong pin. Back to the code, locate the bug this time and now the hello-world program works. Great! Little by little I start adding functions to the code, first to test the peripherals and then to get fancy. And then suddenly it all stops working…
Oops. Now what exactly did I change the last time? Ehmm…
So I start taking bits of code out, but that doesn’t help. I remove more, change this and that, decide that some parts could be coded more elegantly and I end up spending many hours coding without much success.
And then, as suddenly as it stopped working, the program starts working again. Hallelujah! From this moment on, I know from experience, it will never stop working again. No matter what I do, the program will run. There will be a bug every once in a while, but I know I will fix it quickly and I just can’t seem to mess it up anymore. My baby is alive! I master the system without really knowing what went wrong, where and why. Now my prototype can and will grow into a fully functional system.
Fascinating, isn’t it? No? Oh well, I guess you had to be there.
So what’s the point? Well, the fact that I spend many hours fiddling around trying to figure out what and why made me into an expert. The experience gained from debugging and rewriting code helped me understand my system. Since this has happened often to me, I now know that I have to go through this phase to be able to finish the job.
So don’t despair when you can’t find out why your system doesn’t work. Keep patient. You will get there if you are willing to spend the time to learn your system. Once you are the expert, your system will listen to you and obey.
Do you recognise any of this? Let me know how you work, how do you learn your system? Please share your experiences.
It all starts by designing the system, a controller with some peripheral hardware. Once I finally have a prototype of my design the first thing I do is to see if I can talk to the processor. This is always an exciting moment. Will it respond? Will it program?
I prepare a small hello-world type of program and try to load it into the controller (or in its external memory, depending on what I am working on). Suppose all went well and the controller accepted the program (what a deception if it didn’t). Usually the hello-world program is flawed and doesn’t work as intended. Maybe I was too brave and tried to put too much in it, maybe I didn’t understand some functionality? I modify the program and try again, but still nothing. So I hook up the oscilloscope and start probing around. Aha! found a signal, but on the wrong pin. Back to the code, locate the bug this time and now the hello-world program works. Great! Little by little I start adding functions to the code, first to test the peripherals and then to get fancy. And then suddenly it all stops working…
Oops. Now what exactly did I change the last time? Ehmm…
So I start taking bits of code out, but that doesn’t help. I remove more, change this and that, decide that some parts could be coded more elegantly and I end up spending many hours coding without much success.
And then, as suddenly as it stopped working, the program starts working again. Hallelujah! From this moment on, I know from experience, it will never stop working again. No matter what I do, the program will run. There will be a bug every once in a while, but I know I will fix it quickly and I just can’t seem to mess it up anymore. My baby is alive! I master the system without really knowing what went wrong, where and why. Now my prototype can and will grow into a fully functional system.
Fascinating, isn’t it? No? Oh well, I guess you had to be there.
So what’s the point? Well, the fact that I spend many hours fiddling around trying to figure out what and why made me into an expert. The experience gained from debugging and rewriting code helped me understand my system. Since this has happened often to me, I now know that I have to go through this phase to be able to finish the job.
So don’t despair when you can’t find out why your system doesn’t work. Keep patient. You will get there if you are willing to spend the time to learn your system. Once you are the expert, your system will listen to you and obey.
Do you recognise any of this? Let me know how you work, how do you learn your system? Please share your experiences.
Thursday, December 10, 2009
And the winner is…
Last week I did a small survey of microcontroller preferences. Although I had an idea what to expect, there were some surprises in the responses. First of all I received much more reactions than I had hoped for. I would like to say thank you very much to all of you who took the time and effort to reply to this survey! The people that posted a reply (in English!) directly to the blog will find it added to my original post. Those that sent me an email, well, I am very sorry, I am not going to add them all to this blog as there were way, way too many. However, I did spend a few hours reading all the messages and a summary follows here.
What we all want to know now is of course: who won?
But before I will tell you, you will have to read through the following advertisement.
Just joking: the winner is… AVR! Yes, the AVRs received 43% of the votes, while the PIC family lagged behind with 35%. The rest of the votes went to other families of which the MSP430 and the Propeller were mentioned quite often. 8051/2 clones are also reasonably popular.
The main reason for the AVR domination was the available tools. Although free tools exist for many microcontrollers, BASCOM for AVR was mentioned several times and also Arduino. Now this survey originated at Elektor and was read mostly by Elektor readers, so it is biased as Elektor has published quite some projects using BASCOM-AVR, but in general it was felt that the free tools (BASCOM is free only for small executables) for AVR are better than those for PIC. Also the AVR seems to be more easily available and cheaper than a PIC (even more so since Microchip restricted their sampling program), especially important outside the US and Western Europe.
In favour of the PIC was the abundant documentation, examples and free libraries. It is true that Microchip puts a lot of effort in that. On a pure technical level, some people felt that the PIC is less sensitive to noise than the AVR.
Other processors were of course mentioned, but as the survey mainly spoke about PIC and AVR, most people restricted themselves to these two families. However, as stated by several people, if the MSP430 would exist in more DIP packages (only the smallest ones are available in DIP packages), they would definitely prefer it over both PIC and AVR. Surprisingly to me the Propeller from Parallax was mentioned a few times too. Personally I think of this processor more as a sort of freak processor and I would not easily invest time and money in it. Maybe the future proves me wrong, what do I know?
Several people liked the Stellaris, now from TI, others love Freescale.
What is very clear from all the responses and which didn’t surprise me much: architectural reasons clearly do not dominate the choice of a controller family. Once people have learned to use a certain microcontroller family and have invested in tools, they are not very likely to switch to another family from another manufacturer just for the fun of it.
So, my next question is: what does it take to make you switch to a competing microcontroller?
What we all want to know now is of course: who won?
But before I will tell you, you will have to read through the following advertisement.
Just joking: the winner is… AVR! Yes, the AVRs received 43% of the votes, while the PIC family lagged behind with 35%. The rest of the votes went to other families of which the MSP430 and the Propeller were mentioned quite often. 8051/2 clones are also reasonably popular.
The main reason for the AVR domination was the available tools. Although free tools exist for many microcontrollers, BASCOM for AVR was mentioned several times and also Arduino. Now this survey originated at Elektor and was read mostly by Elektor readers, so it is biased as Elektor has published quite some projects using BASCOM-AVR, but in general it was felt that the free tools (BASCOM is free only for small executables) for AVR are better than those for PIC. Also the AVR seems to be more easily available and cheaper than a PIC (even more so since Microchip restricted their sampling program), especially important outside the US and Western Europe.
In favour of the PIC was the abundant documentation, examples and free libraries. It is true that Microchip puts a lot of effort in that. On a pure technical level, some people felt that the PIC is less sensitive to noise than the AVR.
Other processors were of course mentioned, but as the survey mainly spoke about PIC and AVR, most people restricted themselves to these two families. However, as stated by several people, if the MSP430 would exist in more DIP packages (only the smallest ones are available in DIP packages), they would definitely prefer it over both PIC and AVR. Surprisingly to me the Propeller from Parallax was mentioned a few times too. Personally I think of this processor more as a sort of freak processor and I would not easily invest time and money in it. Maybe the future proves me wrong, what do I know?
Several people liked the Stellaris, now from TI, others love Freescale.
What is very clear from all the responses and which didn’t surprise me much: architectural reasons clearly do not dominate the choice of a controller family. Once people have learned to use a certain microcontroller family and have invested in tools, they are not very likely to switch to another family from another manufacturer just for the fun of it.
So, my next question is: what does it take to make you switch to a competing microcontroller?
Subscribe to:
Posts (Atom)
