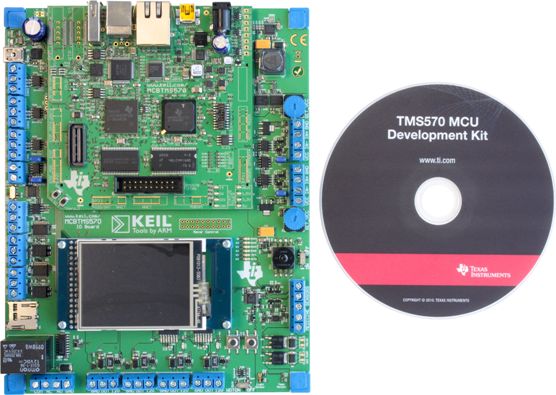
The February issue of Elektor contained an article on the MCU Development Board Benchmark that I introduced in an earlier post. In the article the benchmark was developed slightly further and it ended with a request for comments from the readers. The article also promised to give away the TI TMS570 USB kit that started it all.
A few readers actually responded so we have to keep our promise to give away the kit. But before we do that, let me first resume the comments that came in. Some remarks were rather vague and can not easily be converted into parameters, but several readers proposed a multiplication factor related to the number of operating systems the dev kit will work on: if it runs on Windows, MAC & Linux the factor is 1, if not it will be lower.
Other suggestions concerned more generic criteria like documentation, examples, usability, user friendliness and ease of programming the controller. In my opinion these criteria are actually well covered by the LED blinking test. If you cannot get an LED to blink within a reasonable amount of time and effort, then the kit has a problem. The resulting figure does not indicate where exactly the problem is (IDE, programmer, licenses, etc.), but that's why the test should be accompanied by a detailed article.
OK, that's enough about the benchmark for now. I would like to thank all the people that took the time and effort to participate in this, ehm, project. The winner of the TI TMS570 USB kit is Alexander Steiger. I decided to throw in a Freescale Kinetis KwikStik too and that one is going to Jorgen Sandberg.
Congratulations! to the winners and also a request: if you manage to do something interesting with these kits, please let me know.
P.S. I used the services from Random.org to select the winners as randomly as possible.
Showing posts with label TMS570. Show all posts
Showing posts with label TMS570. Show all posts
Thursday, March 1, 2012


Monday, November 28, 2011
A benchmark for development and evaluation kits
The other day a colleague asked me if I was interested in reviewing the TMS570 MCU Development Kit. This is a kit for playing with the TMS570LS20216 ARM Cortex-R4F microcontroller and when I looked at the picture of the kit available on the product page on TI web site I immediately became interested. It is a big main board with a TFT display and many connectors on which a smaller board sits. The TMS570 microcontroller is designed for use in safety critical systems and as such it includes [quote TI website] dual CPUs in lockstep, CPU and Memory Built-In Self Test (BIST) logic, ECC on both the Flash and the data SRAM, parity on peripheral memories, and loop back capability on peripheral I/O. The Floating Point CPU offers 1.6 DMIPS/MHz, and it has configurations which can run up to 160 MHz providing more than 250 DMIPS. [quote end] The TMS570LS20216 has 2 MB Flash memory and 160 KB SRAM. One might be tempted to say that this is a pretty powerful MCU.
When the kit to review arrived it turned out to be not exactly what I expected, as it was just a large USB stick. The stick is so large because otherwise the MCU in its 144LQFP package wouldn’t fit on it. It came in one of those CD/DVD boxes that we know from TI and that included besides the stick a little flash light, a DVD, a USB extension cable and a flyer with installation instructions. The installation instructions are simple: insert the DVD and do a full install. So I did.

I wrote down the amount of free disk space before launching the install and the time: 9h20. More than 30 minutes and 95 (really!) mouse clicks later the installation was complete. Looking at the free disk space left over I noticed that this demo had used a whopping 7 GB! As a comparison, my Windows XP Pro folder contains 9 GB. To be totally honest, I did this installation twice, the first time I just ran it while trying to do other things. But when the number of mouse clicks and the amazing amount of pop-up windows started bugging me I decided to redo the installation and count and measure the above mentioned parameters.
Naturally I now was pressed to see the demo's, curious to discover what a USB stick with only a few LEDs and a 5 square cm MCU on it supported by 7 GB of software had to offer. Connecting the stick to my PC worked fine, it was recognized immediately, and I started the Safety Demo Software as indicated in step 3 of the installation notes. A window with six large buttons came up and I clicked on the left upper one labelled “Safety Features”. The tool now first programmed the MCU before showing a block diagram of the chip and a list of small buttons on the left that let you generate an error event in the MCU. The error is graphically illustrated in the block diagram and a little red LED is lighted on the board.

You will have little trouble to understand that I was deeply impressed by this convincing demo so I quickly went on to try the others. I clicked the Ambient Light button and a little window with a vertical bar graph showing ambient light intensity came up. A light sensor included on the stick makes this demo possible. If you keep your hand over the stick the bar drops to a few percent and when you shine the flash light on the sensor you can get it up to 100%.
Again, Wow.
So quickly on to the next demo: the Temperature Sensor. Clicking the button opens a small window showing a graph of the temperature. According to the demo the temperature was over 30 degrees Celsius, at least 7 degrees higher than the ambient temperature, but maybe it measured closely to the MCU or the PC? Anyway, this demo was as convincing as the others.
What about the LED Light Show? Again a little window pops up and this time you can start the preprogrammed light show or toggle the six blue LEDs manually. To not spoil the surprise in case you want to buy this development stick yourself I will not tell you what happened but I can assure you that I was again deeply impressed.
If I remember correctly TI was the first to introduce the concept of USB development and evaluation sticks, but where the first one featured an MSP430 MCU that you could break off after programming and then use in your own application, this USB stick seems to be a pure product of marketing. Only 22 of the 144 pins (called “test points”) are brought out to two pin headers although a CAN bus is available too. You get a compiler too, so you can write some code for the MCU but do you really need 7 GB and 95+ mouse clicks for that?
Let us now define a benchmark for MCU development / evaluation kits so we can quickly compare the ease of use and system impact of those kits: the helloWorld (hW). The helloWorld is calculated as mds/(ds*(mc+i)) where “mds” is the highest capacity hard disk available in the year of release of the dev kit (see Wikipedia, in 2011 msb = 4 TB), “ds” stands for disk space needed by the dev kit and mc means mouse clicks needed to get an LED flashing on the dev kit and finally “i” is the number of icons & short-cuts created on the desktop (8 for this kit). With such a benchmark the flash light included in the kit would get a score of infinity because it does not occupy any disk space. The mds parameter is included to introduce an element of time in the benchmark so that it would be possible to compare helloWorld benchmarks over time. You might argue that including Eclipse in a dev kit should be a separate parameter pulling the score down, but Eclipse in itself consumes enough disk space to ensure a low benchmark anyway.
The TMS570 Microcontroller Development Stick presented here scores a value of 4 TB / 7 GB x (95 mouse clicks + 8 icons) = 5.68 helloWorld [hW].
If you have any suggestions of benchmark scores for other dev and or eval (evil?) kits, please do not hesitate to send them to me so I can publish them here.
When the kit to review arrived it turned out to be not exactly what I expected, as it was just a large USB stick. The stick is so large because otherwise the MCU in its 144LQFP package wouldn’t fit on it. It came in one of those CD/DVD boxes that we know from TI and that included besides the stick a little flash light, a DVD, a USB extension cable and a flyer with installation instructions. The installation instructions are simple: insert the DVD and do a full install. So I did.

I wrote down the amount of free disk space before launching the install and the time: 9h20. More than 30 minutes and 95 (really!) mouse clicks later the installation was complete. Looking at the free disk space left over I noticed that this demo had used a whopping 7 GB! As a comparison, my Windows XP Pro folder contains 9 GB. To be totally honest, I did this installation twice, the first time I just ran it while trying to do other things. But when the number of mouse clicks and the amazing amount of pop-up windows started bugging me I decided to redo the installation and count and measure the above mentioned parameters.
Naturally I now was pressed to see the demo's, curious to discover what a USB stick with only a few LEDs and a 5 square cm MCU on it supported by 7 GB of software had to offer. Connecting the stick to my PC worked fine, it was recognized immediately, and I started the Safety Demo Software as indicated in step 3 of the installation notes. A window with six large buttons came up and I clicked on the left upper one labelled “Safety Features”. The tool now first programmed the MCU before showing a block diagram of the chip and a list of small buttons on the left that let you generate an error event in the MCU. The error is graphically illustrated in the block diagram and a little red LED is lighted on the board.

You will have little trouble to understand that I was deeply impressed by this convincing demo so I quickly went on to try the others. I clicked the Ambient Light button and a little window with a vertical bar graph showing ambient light intensity came up. A light sensor included on the stick makes this demo possible. If you keep your hand over the stick the bar drops to a few percent and when you shine the flash light on the sensor you can get it up to 100%.
Again, Wow.
So quickly on to the next demo: the Temperature Sensor. Clicking the button opens a small window showing a graph of the temperature. According to the demo the temperature was over 30 degrees Celsius, at least 7 degrees higher than the ambient temperature, but maybe it measured closely to the MCU or the PC? Anyway, this demo was as convincing as the others.
What about the LED Light Show? Again a little window pops up and this time you can start the preprogrammed light show or toggle the six blue LEDs manually. To not spoil the surprise in case you want to buy this development stick yourself I will not tell you what happened but I can assure you that I was again deeply impressed.
If I remember correctly TI was the first to introduce the concept of USB development and evaluation sticks, but where the first one featured an MSP430 MCU that you could break off after programming and then use in your own application, this USB stick seems to be a pure product of marketing. Only 22 of the 144 pins (called “test points”) are brought out to two pin headers although a CAN bus is available too. You get a compiler too, so you can write some code for the MCU but do you really need 7 GB and 95+ mouse clicks for that?
Let us now define a benchmark for MCU development / evaluation kits so we can quickly compare the ease of use and system impact of those kits: the helloWorld (hW). The helloWorld is calculated as mds/(ds*(mc+i)) where “mds” is the highest capacity hard disk available in the year of release of the dev kit (see Wikipedia, in 2011 msb = 4 TB), “ds” stands for disk space needed by the dev kit and mc means mouse clicks needed to get an LED flashing on the dev kit and finally “i” is the number of icons & short-cuts created on the desktop (8 for this kit). With such a benchmark the flash light included in the kit would get a score of infinity because it does not occupy any disk space. The mds parameter is included to introduce an element of time in the benchmark so that it would be possible to compare helloWorld benchmarks over time. You might argue that including Eclipse in a dev kit should be a separate parameter pulling the score down, but Eclipse in itself consumes enough disk space to ensure a low benchmark anyway.
The TMS570 Microcontroller Development Stick presented here scores a value of 4 TB / 7 GB x (95 mouse clicks + 8 icons) = 5.68 helloWorld [hW].
If you have any suggestions of benchmark scores for other dev and or eval (evil?) kits, please do not hesitate to send them to me so I can publish them here.
Subscribe to:
Posts (Atom)